Sunday, 27 January 2013

The 60s Dress Project - Part 2

The next step in creating this dress is creating a pattern for the pleats. To do this I had to draw out the skirt pattern with the  pleats drawn in. I cut down the line of the first pleat, leaving a 1.5 cm gap and draw a line. I then folded over the pleat on to this line and repeated this three times.
 
I then created the final pattern for the pleats. I ironed the pleats flat, this allows me the get the measurements exact. I traced the pleat pattern on to another piece of paper and added a 1cm seam allowance.
 
The next thing I did was make the pattern for the neck facing. This feature makes the neckline tidy. I drew a 5cm curved line down from the neckline and made sure it joined the shoulder.
 
I traced this to make the final pattern and added a 1cm seam allowance and grain line.
 
The next feature I created was the sleeve. To do this I traced around a sleeve block. Then I chose how long I wanted my sleeve and drew a line to mark this. I then created a final pattern piece for the sleeve by tracing it and adding a 2cm hem and a 1cm seam allowance. It then was time to cut out the fabric for the dress.


Origami

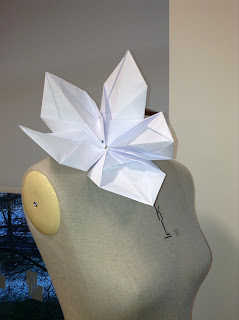
For the  brief I am currently doing at college, I have to research textile designers. While conducting  out this research I found a designer I really liked, Fred Butler. When looking closely at her work I saw a that she used origami in her designs. I decided to do some college work inspired by Fred Butler. I created some origami and placed them on a mannequin to see how you could incorporate them in a  garment.


Above is examples of Fred Butler's work.
Below is my work.


The 60s Dress Project - Part 1

Every Wednesday at college there is a pattern cutting lesson. During those lessons we are learning how to manufacture four different types of dresses.  The first dress is a 60s styled dress.
 
 
The first thing I did was make a dress bock. This is the basic shape which I start off with for every dress. This is traced on to pattern paper, ready for me to make adaptions. After drawing around the outside the dress block I drew in the darts and the labels. This is my first draft of the pattern.
 
The dress we were making was loose fitting whereas the dress block was semi-fitted. I adjusted this by making the sides straight the sides. This was done by lining our set square with the hip line and draw the line straight up to the arm hole. This was done on both the back and front of the  dress.
 
 
The next thing I did was decide the length of my dresss. I drew down from the hip line to the lenght I wanted and  squared off. I then marked on the pattern where the I wanted the pleats. They had to be 2cm apart; this made the pleats equal.
 
 
For his 60's style dress I had to move the dart which was quite simple to do. From the end of the original dart, I drew another line in the place where we wanted the new dart to be placed. It was best to place the dart a bit away from the arm hole. This stops it from becoming bulky.
 
Once this was finished I got another piece of paper and traced out the 1st draft (front and back). After this I cut along the new dart line on the traced version. I then folded over it over so you couldn;t see the orignal dart anymore.
 
I needed to cancel out the back dart. This was done by measuring the shoulder lenght on the block. From this measurment I needed to canel out 1cm from the arm hole corner. Then I joined the arm whole with shoulder using my set square. I scribbeled out the dart as it was no longer needed.

 
The next thing I did was place the lined patch pocket. Under the hip line is were I placed it. I drew a square to the size I wanted the pocket and then curved the botom corners.
 
I then created a final pattern for the pocket by tracing it out on another piece of paper. I then drew in a 1cm seam allowence around the outline and placed a gran line.


Knitting Workshop


Yesterday we had someone come it to college to teach us how to knit. I struggled to cast on and it took someone to show about ten times before I got the hang of it.  To start of with we knitted with wool which I will admit my wool sample had a couple of holes in and it wasn't exactly straight.  After that we had to knit with something alternative. I chose lace. This was difficult because there was no stretch in the lace. I also knitted with fabric and different wool. 

Thursday, 24 January 2013

Manipulating Fabric Workshop

I have completed another workshop. This one was about manipulating fabric. I found it OK and managed to try a two different ways of manipulating fabric.

This technique is called furrowing.


Placing this sample on the mannequin gave me the idea to use it on the shoulder of a garment. This would bring attention to this area.
I created another furrowing sample with a patterned fabric. I thought this would look quite nice as a strap on a garment.

Another technique I tried was pleats.


Sunday, 13 January 2013

My Paintings

I like to paint in my spare time. Here are some of the paintings I have completed. I would say most of my work is abstract because that is the style I most enjoy painting in. If you would like to see more of my work here is a link to my Deviantart page http://bexter18.deviantart.com/ .


Observational Drawings

 I did some more observational drawings in my sketch book. I am going to use these as inspiration for my samples I make in the textile workshops.